
The best way to learn about a new technology is to use it, and with that, I took a look at the Deepseek API to see what it could do. Here’s the thing: I’m not an AI expert, and I’m working to figure out all the ins and outs of working with AI, but throwing yourself in can be the best way to figure things out.
Setting up your Account
Getting started with Deepseek is pretty easy. First, I signed up for an account at https://www.deepseek.com/en. From there, you need to generate an API Key. This exists on the left-hand navigation. Now, from her,e I started trying to code things and started to get back errors on not being authorized, and realized I needed to purchase some tokens for my queries. I was (am still) a bit worried about my overall usage, but so far, with $10 in tokens, I’ve been able to get some good usage out of the API.
Here you can see my execution across the deepseek-chat and deepseek-reasoner APIs.
Chat vs Reasoner
When using the API you have the option to query against one of two models.
The Chat model works for general conversation and chat applications.
The Reasoner model is more focused on complex problem-solving and reasoning tasks.
You can use the same submission type, but the resulting json nodes are slightly different when returned.
Temperature, Roles and Tokens
In addition to the chat model, you can specify the temperature and the maximum amount of tokens you want applied to the query.
The temperature parameter applies to your use scale and is a sliding scale of what it can accomplish and how to answer the question. Much like those conversations you have around problem solving that start like – let’s keep this on planet Earth and go all the way to – the sky’s the limit – one being more grounded in reality and the other getting more creative as you go.
| USE CASE | TEMPERATURE |
|---|---|
| Coding / Math | 0.0 |
| Data Cleaning / Data Analysis | 1.0 |
| General Conversation | 1.3 |
| Translation | 1.3 |
| Creative Writing / Poetry | 1.5 |
Lastly, as you’ll see in the example below, we supply a parameter called “role” and define it as system, user or assistant. In this context, the role is the person who is “speaking” in the conversation. In our scenario and request to the api, we will be asking the question, so our role will be user.
The Code
The following code below outlines a simple call where I sent it a question on overall sprint completion.
Like any Http call, we are using HTTP Client to accomplish the task, passing in our API key. If you look closely, you’ll notice where the result set is different between deepseek-chat and deepseek-reasoner.
string apikey = "YOUR KEY GOES HERE";
string apiUrl = "https://api.deepseek.com/v1/chat/completions"; // Verify the correct endpoint
string model = "deepseek-reasoner"; //deepseek-chat or deepseek-reasoner
Console.WriteLine("Starting to Go Deep…");
Console.WriteLine($"Using model {model}.");

using (HttpClient client = new HttpClient())
{
// Set headers
client.DefaultRequestHeaders.Add("Authorization", $"Bearer {apikey}");
client.DefaultRequestHeaders.Add("Accept", "application/json");

// Prepare the request body
var requestData = new
{
    model = model,
    messages = new[]
    {
    new { role = "user", content = "If we have 135 story points to complete and our current velocity on the team is 10.3 points per day, how long will it take us to complete all of the story points and how many people will we need assuming each person can only work on 3.7 points per day." }
},
    temperature = 0.3,
    max_tokens = 500
};

string jsonPayload = JsonConvert.SerializeObject(requestData);
var content = new StringContent(jsonPayload, System.Text.Encoding.UTF8, "application/json");

// Send POST request
HttpResponseMessage response = await client.PostAsync(apiUrl, content);

if (response.IsSuccessStatusCode)
{
    string responseJson = await response.Content.ReadAsStringAsync();
    dynamic responseData = JsonConvert.DeserializeObject(responseJson);
    string calculationResult = string.Empty;

    // Extract the calculation result
    if (model == "deepseek-chat")
    {
        calculationResult = responseData.choices[0].message.content;
    }
    else
    {
        calculationResult = responseData.choices[0].message.reasoning_content;
    }

    Console.WriteLine("Calculation Result:\n" + calculationResult);
}
else
{
    Console.WriteLine($"Error: {response.StatusCode}");
    string errorContent = await response.Content.ReadAsStringAsync();
    Console.WriteLine(errorContent);
}

}
The Output
Below is the output of both Chat and Reasoner models. As you can see with the reasoner model, we get more detailed information back based on our query, but not only that, we get a detailed description of just how the query can be handled, which is great if you’re trying to figure out and apply this problem somewhere else.
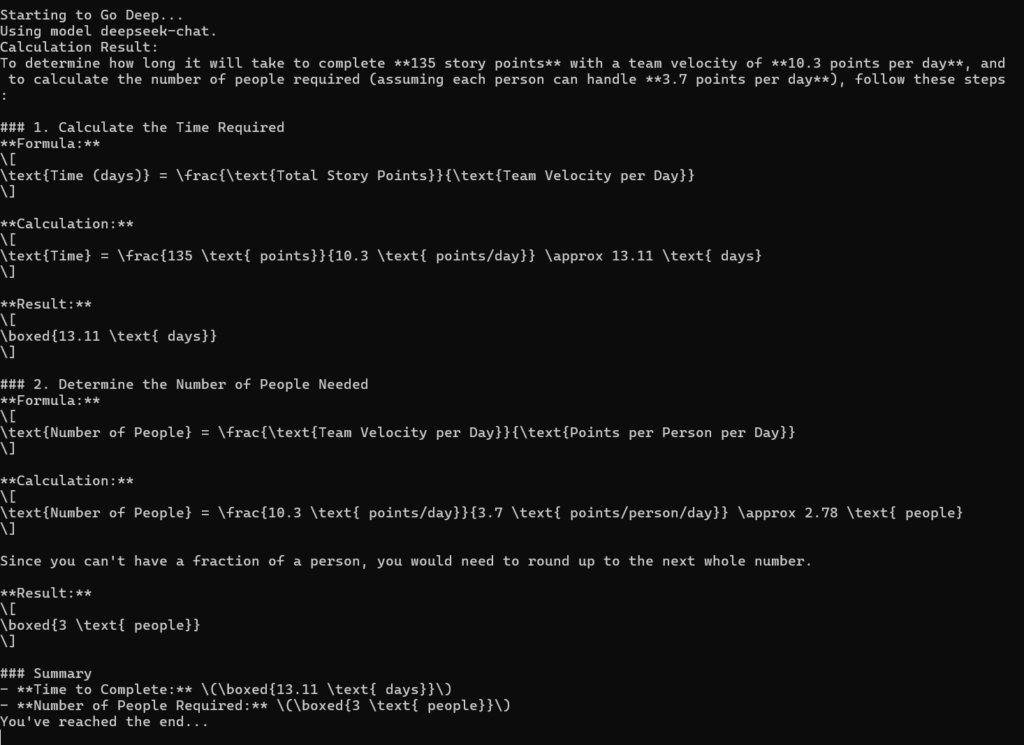
With Chat
In my first run through with the API, I very much liked how I got back explanations of why the number was calculated as it was.
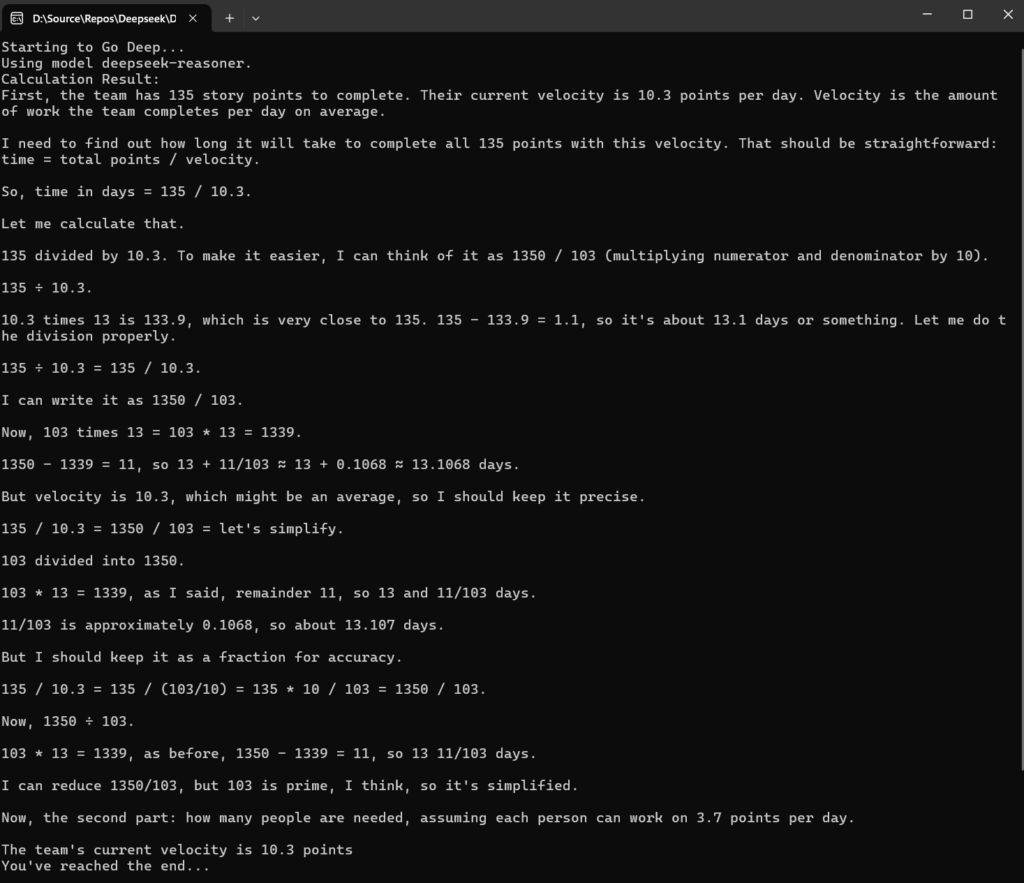
With Reasoner
As you can see from the below with Reasoner, we get back much more in the way of mathematical formulas, which help us better understand the problem, how it’s solve,d and what we’re looking for.
Is this simplistic to get started with?
Of course it is, but that’s the idea when you’re trying something new.